Boarding Out Stud Wall Advice

Joined
27 Jan 2008
Messages
106
Reaction score
0
Location
Cumbria
Country
United Kingdom
Hi all
I have recently boarded out a room (with lots of help of these forums), and Im about ready to start plasterboarding it.

Ive never boarded out before, so this is going to be a learning curve for me. Im a few dozen videos into that learning! Last thing I want to do is make life harder for the plaster, and I just had a couple of questions of things I dont understand. Any advice would be appreciated.

I understand that tapered edges are better when butted together, to create a good join. What do you use going into corners, either internal or extermal corners. Do you buy seperate sheets of square edge plasterboard for these edges, or would you cut the edge off the tapered edge sheets?

Im doing it on my own, and as above Ive not done it before. I know you can get huge 2.4m sheets, but for one man I think these would be tough to handle...however, Im concerned that if I get the smaller sheets, the top/bottom edges arent tapered, so I would imagine this makes life harder for the plaster. What size do people normally order when doing the install solo?

Im planning to use screws. Should I coutersink, or just screw them in gong a little deper than the surface, and then cover them with filler? If covering with filler, does each screw need priming...or are plasterboard screws pre-primed?

Thanks guys...open to any other tips which might be useful for a complete noob!
 
Sponsored Links
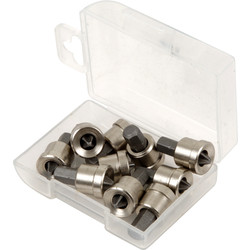
I will leave the other questions but as for the screws you can get a little attachment that stops the screw going in too deep, you dont want to break the paper surface around the screw.
These
 
You said that you have watched lots of Utube but you are asking if you need to countersink :eek: no - do not countersink

Be careful you are not watching US vids as they do things differently.
 
You said that you have watched lots of Utube but you are asking if you need to countersink :eek: no - do not countersink

Be careful you are not watching US vids as they do things differently.
Ive seen videos where the use dot and dab + nails (not screws) and some videos where they dont seem to countersink at all.... but I think as you say I may have been watching some US ones. Thank you.
 
Sponsored Links
Ive seen videos where the use dot and dab + nails (not screws) and some videos where they dont seem to countersink at all.... but I think as you say I may have been watching some US ones. Thank you.
Ah I was assuming that it was a studded wood wall because you mentioned screws. If it is a brick wall then its the dot and dab method and no screws are involved.
 
I will leave the other questions but as for the screws you can get a little attachment that stops the screw going in too deep, you dont want to break the paper surface around the screw.
These
Thats genius! I cant quite tell how it works from the photo, but assuming the bit holds your screw, and when your screw is at the right depth it shampfers around the screw hole?

Assume they come in a pack of 10 because the impact driver will wipe the bits out at a rate of knotts?
 
Last edited:
Ah I was assuming that it was a studded wood wall because you mentioned screws. If it is a brick wall then its the dot and dab method and no screws are involved.
It is a stud wall.... yes I couldnt quite understand why people were dot and dabbing to a stud wall either.... video
 
Thats genius! I cant quite tell how it works from the photo, but assuming the bit holds your screw, and when your screw is at the right depth it shampfers around the screw hole?

Why do they come as a set of 10?
That was just an example of them, you can buy them singularly and sometimes you get one in a box of plasterboard screws

There is no chamfering for plasterboard - you do not want to break the paper surface and the shroud on the bit stops the screw from going in too deep.
 
That was just an example of them, you can buy them singularly and sometimes you get one in a box of plasterboard screws

There is no chamfering for plasterboard - you do not want to break the paper surface and the shroud on the bit stops the screw from going in too deep.
thank you.
 
A tip - dont scrim and buy the cheap screws I had some no name things and had old seasoned joists to screw into and some of the screws snapped. So I used Timco and they are much better. Sorry TYMCO not timco
If you make a mistake and go in at an angle or something and break the paper surface the best thing to do is take the screw out and put another one in next to it.
 
Last edited:
A tip - dont scrim and buy the cheap screws I had some no name things and had old seasoned joists to screw into and some of the screws snapped. So I used Timco and they are much better. Sorry TYMCO not timco
If you make a mistake and go in at an angle or something and break the paper surface the best thing to do is take the screw out and put another one in next to it.
Are these the ones mate?

 
Yes but you need to research what length you will need. And work out how many you will need - it will be more than you think at the correct distance centres.
 
Also maybe just me but try an use as bigger piece of board you can which will mean less joints that may or may not crack. If you have two studs vertical and the board only goes half way up then add a stud horizontal at the meeting point between the top of one board and the bottom of the other, dont leave any floating edges.
 

DIYnot Local

Staff member

If you need to find a tradesperson to get your job done, please try our local search below, or if you are doing it yourself you can find suppliers local to you.

Select the supplier or trade you require, enter your location to begin your search.


Are you a trade or supplier? You can create your listing free at DIYnot Local

 
Sponsored Links
Back
Top