Jaguar 28KW Combi Boiler, how to change diaphragm?

Over the last couple of days I've had a couple of slight spanners in the works. Thames Water have virtually doubled our water pressure (to a respectable pressure) and that coupled with the inevitable wear on the o-rings over time means that I have got wet a couple of times. To put it succinctly the pressure pushes the bundy tubes out over time. I've re-seated them a couple of times, pushing them in as far as they'll go and tightening the clips with pliers first, but the buggers slowly work loose so I daren't leave the supply to the hot water turned on when I sleep or leave the house. I've tried looking up the quoted number for the o-rings earlier in the thread E26-660 but can't find them. Has anyone got a different part number? Or are o-rings this size just a normal consumable available at Part-Centre etc. Oh and yes you do deserve a medal
 
Sponsored Links
If the pressure is really that high then new 'O' rings are unlikely to help much.

Where are you? Most of London you are lucky to get 1.5 Bar!

You may be better fitting a pressure reducing valve. But these boiler systems work fine up to 3-4 Bar.

Tony
 
Hi Tony. It isn't that high! About 1.9 bar but that beats the struggle to 1.1 there was before (made pressurising the heating circuit fun, had to do it when water demands were low). I am glad the pressure is higher but think the seal on the o rings is not particularly tight and the increase in pressure was just too much for them, or rather one of them, so it slowly worked out like a piston. It may hold now I've re-tightened the clips but I have noticed that it has moved a touch so I am not exactly relaxed about leaving it.
 
I spoke to PartCentre who said I'd need to speak to Glow-Worm and I've received a reply this morning, so if you do need the O-Rings the part number is 0020027585.
 
Sponsored Links
The 'O' rings are only there to give a seal !

Holding it in is by the clip. They do need to be tight and not bent when put in place which is quite difficult on this model.

Tony
 
Thanks for that Tony. It made me go and have another look. I realised that I could push the tubes further into their sockets, thus the clips sit on the outside of the step in the tube,locating them firmly, I thought it was a cr&ppy design relying on the tightness of the spring sitting on the tube to hold them in place. It was my shoddy workmanship instead :oops: Oh, well, this might help someone else with the same problem

Cheers

D
 
I realised that I could push the tubes further into their sockets, thus the clips sit on the outside of the step in the tube,locating them firmly, I thought it was a cr&ppy design relying on the tightness of the spring sitting on the tube to hold them in place. It was my shoddy workmanship instead :oops: Oh, well, this might help someone else with the same problem

I had exactly the same issue...I could only get them in properly with the diaphragm housing not attached to the main block.

(for full instructions, see page 2)
 
Another many thanks post HOWEVER...... :oops:

Muppet features here didnt take a note on which way round the diaphragm sits in the housing :oops:

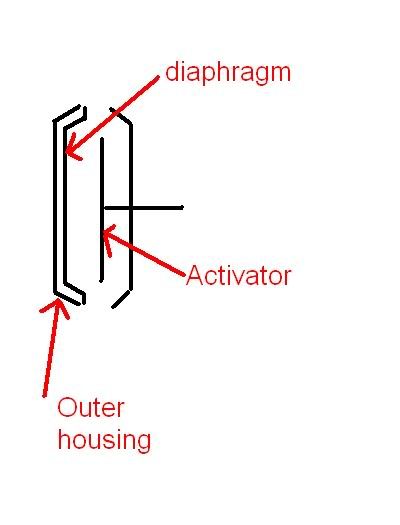
I feel as though the diaphragm should sit in the outside housing pointing into the housing see below

boiler.jpg


Or have I got it the wrong way round and it should be pointing out of the outer housing ??

Chris
 
that looks correct.

I did think as much, but you know how it is, I re-read the thread and saw the bit about "note which way it goes" and then thought ah, then the niggles started :rolleyes:

Examined the old one to try and see which way it fitted but just couldnt be 100% sure so thought I'd do a pretty diagram just to be sure and it might help other muppets :LOL: :LOL: :LOL: :LOL:

Just gota get the valve back in now as I thought I might as well hook the whole unit out and check the slides while I was there and descale the hot DHW heat exchanger while I was in there too, no point in doing half a job ;)

Many thanks

Chris
 
crikey, thats alot for a diyer, I assume you've had to remove the pump to get the heat exchanger out? Make sure you've got plenty of grease for the rear oring and make sure you get the clip in properly, helps if you can get your head around the right hand side to see. You can also disturb the connection into the main heat exchanger when you disconnect the top pump connection! Also the plate washer might not seal well if they've become brittle :unsure: good luck !
 
crikey, thats alot for a diyer, I assume you've had to remove the pump to get the heat exchanger out? Make sure you've got plenty of grease for the rear oring and make sure you get the clip in properly, helps if you can get your head around the right hand side to see. You can also disturb the connection into the main heat exchanger when you disconnect the top pump connection! Also the plate washer might not seal well if they've become brittle :unsure: good luck !

Drop in the ocean ;) lets say I'm not the average DIY'er ;) , I installed the whole system bar the gas main, have had the DHW exchanger off before for a descale, yep pump out and all the rest that goes with it :rolleyes:
Thanks for the tips, got plenty of silicon grease as part of my plumbing arsenal of goodies and a new plate washer to go on, cos as you say its gone all brittle :rolleyes:

TBH its fairly simple compared to stripping out and replacing the valve stem oil seals on a over head cam engine ;) I just dont like having to do jobs twice, hence the original post :cool:

Chris
 
All back together and all seems well, I hate these naff o-rings and clips, what a rubish way of connecting stuff up, nasty nasty nasty stuff, as per normal it seemed to want to leak like a sieve till it had warmed up and settled down :rolleyes:

Thanks again DIYnot forum posters, will try and repay the info with stuff I've found out and done over the years

Chris
 
thanks for this VERY old post, worked a treat

P.S must remember to switch off the water to the boiler before removing the two chrome pipes coming off the valve,lol

Cheers
Grand
 

DIYnot Local

Staff member

If you need to find a tradesperson to get your job done, please try our local search below, or if you are doing it yourself you can find suppliers local to you.

Select the supplier or trade you require, enter your location to begin your search.


Are you a trade or supplier? You can create your listing free at DIYnot Local

 
Sponsored Links
Back
Top