With the cover off and shower on, you can/should see exactly where its pouring down from. @Elkato531 post #38 might advise.

You are using an out of date browser. It may not display this or other websites correctly.
You should upgrade or use an alternative browser.
You should upgrade or use an alternative browser.
New Triton shower leaking from bottom
- Thread starter DIY67
- Start date
Ok, I assume you are referring to the relief hole that the excess water is leaking out from ? I have looked on the Triton website but can't see any reference to change it except a basic blueprint.With the cover off and shower on, you can/should see exactly where its pouring down from. @Elkato531 post #38 might advise.
I will do that but thanks for your help and patience.Yes, I can't think of any other easy way of identifying it. Maybe give Triton a buzz tomorrow.
No need!!
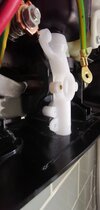
There it is look, where we thought it might be, item 5.

There it is look, where we thought it might be, item 5.
Last edited:
Ok, good. I still can't fathom how to get to it though.
It says, (after the one?? securing screw is removed) to give it a twist and pull it down to remove it, which, looks like twist to the right and pull. It also states to ensure that the O ring is in place before replacing it. You can clearly see the PRD spout at the rear just above the hose attachment.
You might/should be able to remove a bit of trim on the shower body where the outlet exits to give you more room.
Video gives a idea of how its done, except you may have to twist yours the other way.

 www.showerdoc.com

You might/should be able to remove a bit of trim on the shower body where the outlet exits to give you more room.
Video gives a idea of how its done, except you may have to twist yours the other way.
Triton Pressure Relief Device - 82800450 | Spare PartTriton Pressure Relief Device - 82800450 | Spare Part | TRITO-82800450
Official Stockists of Triton Pressure Relief Device - 82800450 - Buy it now from the UK's leading supplier of Triton Pressure Relief Devices
www.showerdoc.com
Last edited:
Thanks again, much appreciated but I cannot get it to come out. It's impossible as no hole underneath. It twists a little but frustratingly no way of pulling it out.It says, (after the one?? securing screw is removed) to give it a twist and pull it down to remove it, which, looks like twist to the right and pull. It also states to ensure that the O ring is in place before replacing it. You can clearly see the PRD spout at the rear just above the hose attachment.
You might/should be able to remove a bit of trim on the shower body where the outlet exits to give you more room.
Video gives a idea of how its done, except you may have to twist yours the other way.
Triton Pressure Relief Device - 82800450 | Spare PartTriton Pressure Relief Device - 82800450 | Spare Part | TRITO-82800450
Official Stockists of Triton Pressure Relief Device - 82800450 - Buy it now from the UK's leading supplier of Triton Pressure Relief Devices
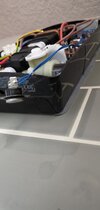
View attachment 350173
Attachments
Absolutely not. I will contact them now. Again, hanks for your help.So you can't pull it out&down?, give Triton customer care a buzz.
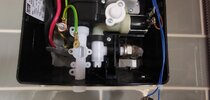
Update - Triton say you can unclip the bottom of the plastic housing but of course the sealant is stopping me removing it. What a ridiculous set up!
Attachments
Last edited:
- Joined
- 8 May 2017
- Messages
- 10,606
- Reaction score
- 2,851
- Country

Sealant shouldn't be applied in the first place. Just cut the sealant away, pull off the lower plastic housing and remove the prv assembly.
If I cut it away enough (and this wouldn't be easy as it is really thick and strong and will make the finish look a dog's dinner) to release the housing, it will still leave the electrics being exposed to possible water. Also don't want it leaking into the brickwork where the water pipe comes in. So I'll just have to put it all back together and live with the dripping. What a faff and very poor design when most other showers are so easy to remove the part..Sealant shouldn't be applied in the first place. Just cut the sealant away, pull off the lower plastic housing and remove the prv assembly.
Attachments

- Joined
- 8 May 2017
- Messages
- 10,606
- Reaction score
- 2,851
- Country
Do as you wish ,but it's not rocket science to remove silicone ,and reseal if you want to afterwards.
There is nothing wrong with the design of the shower, any decent plumber could sort your problem out easily.
There is nothing wrong with the design of the shower, any decent plumber could sort your problem out easily.
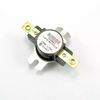
When refitting the TCO don't press on the the disc with your finger(s) as it may not reset which means a new one required.
I'm a bit surprised that a very new shower like that has separate TCOs, one, self resetting, on the outlet pipe, should operate at 48C/50C, and switches off one heating element, the other, which has to be renewed, is probable set to 75C and is mounted on top of the heating can and kills the power to both elements. These two, for years now, are combined and mounted on top of the heating can, the self resetting one operates at 48C/50C and interrupts the power to both elements, the second, (non resettable)at 75C, kills the power permanently to both elements and that's why the PRD is able to be mounted on the front of the outlet pipe, like my Triton T80 easyfit.
Example below of the duo disc type.
Attachments
DIYnot Local
Staff member
If you need to find a tradesperson to get your job done, please try our local search below, or if you are doing it yourself you can find suppliers local to you.
Select the supplier or trade you require, enter your location to begin your search.
Please select a service and enter a location to continue...
Are you a trade or supplier? You can create your listing free at DIYnot Local
Similar threads
- Replies
- 14
- Views
- 11K
L